How to Use the Apple Reminders App to Stay on Track
Here’s how I actually use the Apple Reminders App to stay organized — with lists, tags, smart sorting, and location tricks.
Hey Productivity Community,
If you’ve ever opened the Reminders app on your iPhone and immediately closed it because it looked “too basic,” this post is for you. Apple’s Reminders app is extremely underrated. Behind its simple interface is a powerful, free tool that can keep you organized in every area of your life — whether you're managing tasks for work, errands for home, or reminders for your wellness routine.
Today, I’m walking you through exactly how I use the Apple Reminders app to stay on top of everything. I’ll break down the core features, advanced tips, and creative ways to use it, with images so you can follow along.
🟡 Getting Started: The Basics
The Reminders app is already installed on every iPhone. You can also access it from your iPad, Apple Watch, and Mac. It syncs through iCloud, so everything stays up to date.
Key Features at a Glance:
Lists
Smart Lists
Tags
Priorities
Subtasks
Due dates & times
Locations
Flags
Shared lists
🗂️ Step 1: Create Your First List
Lists are the containers for your reminders. I like to keep my lists organized by category: Personal, Work, Errands, Health, etc.
Think of Lists as your categories — not just random buckets.
Here’s how I break mine up:
💼 Work
🧃Grocery
🛒 Errands
💬 People to Follow Up With
🧽 House Stuff
To make a new one:
Open the Reminders app.
Tap “Add List” in the bottom right.
Choose a name, color, and icon.
Tap Done.
Tips:
Use emojis in your list titles to make them pop.
Choose a consistent naming system if you have lots of lists. Name it something you’ll actually recognize and stick to a format (e.g. “📁 Work – Content,” “🏠 Personal – Goals,” “🧼 Home – Cleaning,” “💳 Finance – Bills”).
✅ Step 2: Add Your Tasks
Now, start adding reminders (tasks) to your lists. You can keep it simple — just type in the task — or you can tap the (i) button to add more detail.
Add-on Options:
Date/Time: Set a due date and even a specific time to get a notification.
Location: Get reminded when you arrive at or leave a place.
Tag: Add searchable tags for organization.
Flag: Mark high-priority tasks.
Notes: Add extra context or links.
Subtasks: Break your reminder into smaller action steps.
Example:
Reminder: “Submit project proposal”
Due: Tuesday @ 4 PM
Subtasks: “Write draft,” “Add links,” “Send to team”
Tag: #Job Name
🏷 Step 3: Use Tags + 🧠 Smart Lists
Tags make your reminders flexible across categories. You might have one tag for #calls, another for #errands, or #writing.
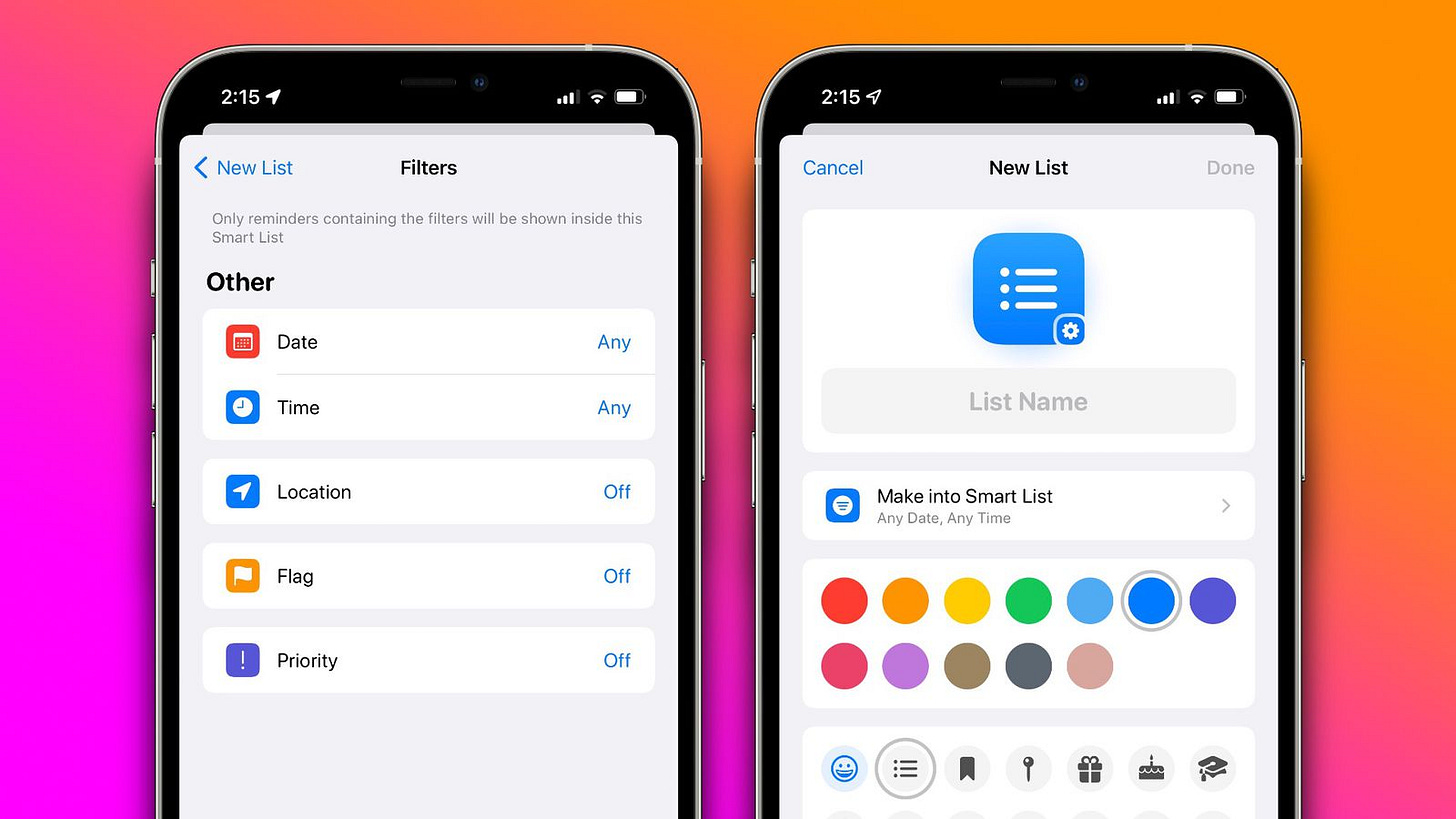
You can then create Smart Lists, which automatically pull in reminders based on filters (tags, due dates, etc.). So if something’s tagged #calls, it doesn’t matter if it’s in your “Work” list or “Errands” list — you can see them all in one place.
Smart Lists are like filters. You tell it what to pull in, and it does the rest.
You can make a Smart List that shows:
All reminders due today
All tasks tagged #urgent
Anything that’s flagged
Tasks from certain lists only
To create a Smart List:
Tap “Add List” → Choose Make into Smart List.
Set your filter (e.g., all reminders with the tag #urgent).
Choose a color/icon and hit Done.
Now you can instantly view all tasks due today, all errands, or anything tagged #followup, regardless of which list it lives in.
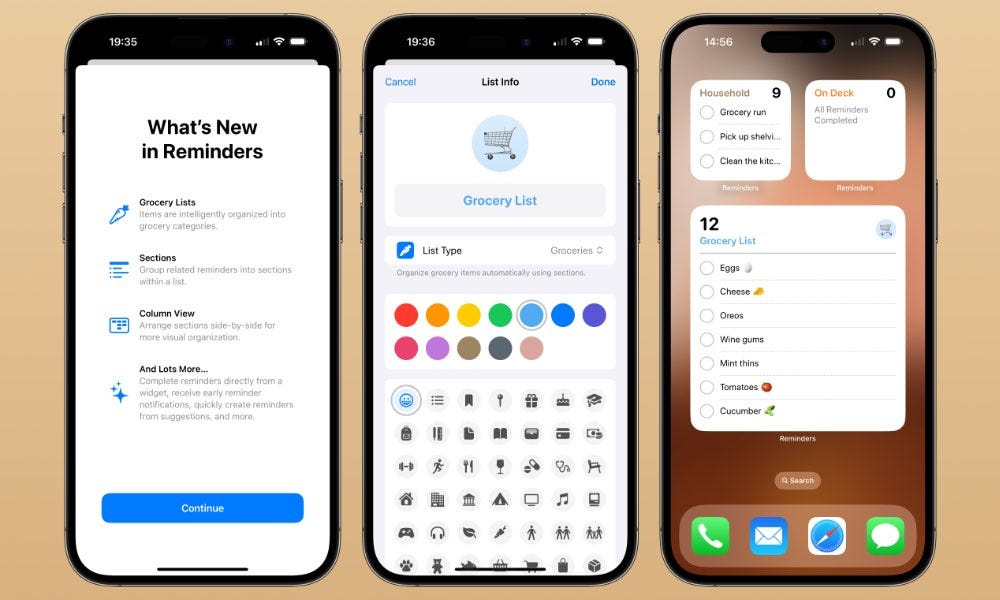
🛒 Smart Grocery Lists & Sections You Don’t Have to Touch
One of the most underrated features in Reminders is how it handles grocery lists — and how you can manually use sections in any list to organize your tasks visually.
If you create a new list and select the “Groceries” list type, Apple Reminders will automatically recognize what you're typing (like “milk,” “bread,” “toothpaste”) and group those items into categories for you — like Dairy, Bakery, or Personal Care. No setup needed.
You can still move things around manually, but most of it happens for you.
🗂 Using Sections for Non-Grocery Lists
Even if you’re not making a grocery list, you can use sections to break any list down into chunks that make more sense for your brain.
Example:
In a “Work – Content” list, I’ll break it down like this:
🎥 YouTube
📝 Newsletter
📅 Upcoming Projects
To do this:
Tap your list
Tap the three dots in the corner
Select Add Section
Name it → then drag your tasks into the section
You can also use sections for things like:
Morning vs. evening routines
“Waiting on” vs “To do now”
Breaking up big project tasks into stages
📍 Bonus: Location-Based Reminders
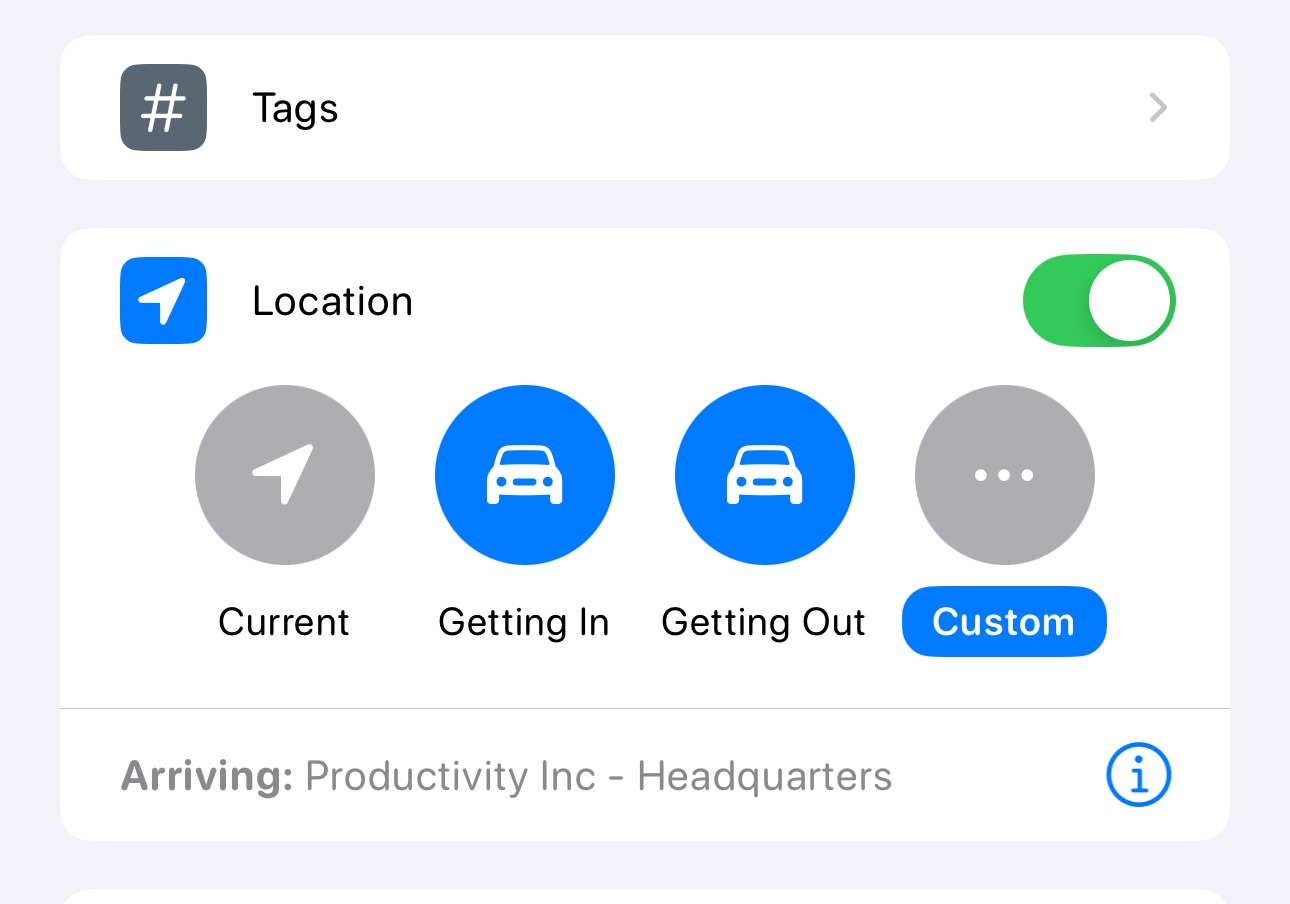
One of my favorite features: get reminded when you arrive at or leave a specific location.
Use this for:
🛒 “Grocery list” → remind me when I get to the store
🧺 “Pick up laundry” → remind me when I get home
🚮 “Take out trash” → remind me when I arrive home
✉️ “Grab stamps” → remind me when I get to the post office
🩺 “Ask doctor about prescription” → remind me when I’m at the clinic
🛡 “Ask about insurance” → remind me when I’m at the doctor’s office
How to set it:
Tap the (i) icon on a task.
Toggle Location on and choose your location (search or drop a pin).
Choose “When arriving” or “When leaving.”
👥 Sharing & Collaboration
You can share lists with others, which is perfect for:
Grocery or shopping lists with family
Task delegation with a teammate
Planning travel or events with friends
To share:
Tap the list name → Tap the Share icon.
Send via iMessage or generate a shareable link.
Bonus: Collaborators can add or complete items in real time!
📊 Prioritize with Flags & Priorities
You can mark reminders as High, Medium, Low priority, or Flag them. Then filter through your Smart Lists to focus only on what matters.
Example setup:
Flag all tasks you must finish today
High Priority = urgent but not time-bound
Medium Priority = needs doing this week
Low Priority = optional or long-term
🧠 Creative Use Cases
Here’s how I use Reminders outside just to-dos:
Idea Dump List: Jot down content or product ideas as they hit you.
Recurring Tasks: Use for weekly planning, habit tracking, and monthly reviews.
Quick Journaling: Set a daily reminder at night with a prompt.
Voice-activated Reminders: Ask Siri, “Remind me to email Jordan at 10 a.m.” — it’ll show up instantly.
💻 Using Reminders on Your Mac
Yes — the Reminders app works on your Mac too, and everything syncs automatically through iCloud.
The layout looks a little different (of course, it’s boxed out and stretched more on a laptop), but the settings and features are basically all in the same places. You still get your smart lists, tags, location-based alerts, sections, and more — just with a sidebar and a little more breathing room.
It’s especially useful if:
You’re planning your week or batching tasks at your desk
You want to type out long reminders faster
You’re dragging things over from Notes or Safari while you work
You can create lists, reorder tasks, add sections, and use the same (i) menu to adjust notifications or add subtasks. Everything syncs smoothly, so if you add something from your phone, it’ll show up on your Mac — and vice versa.
🧩 Final Thoughts
Reminders is one of those apps that’s already on your phone, but most people aren’t using it fully. It’s simple, but it’s got layers — and if you build your system around it, you don’t need to juggle 5 other tools.
Let me know what you'd like to see next, or drop your favorite Reminders hack below.
Until next time,
Tamia L.
Productivity Headquarters | ✨ Everything you need right at your fingertips


